


� 2019 JimVonBaden/JVB Productions
�
Tire Change Pictorial on an R1200GS
(similar on most bikes.)
Caution: This pictorial is for informational purposses only. I accept no responsibility for accuracy, or any damage caused to your motorcycle if you choose to perform these maintenance items.
Since I am often asked to help people change their tires, I thought it would be cool to make up a little tutorial about how it is done. It wont substitute for direct experience, but it should give you a start.
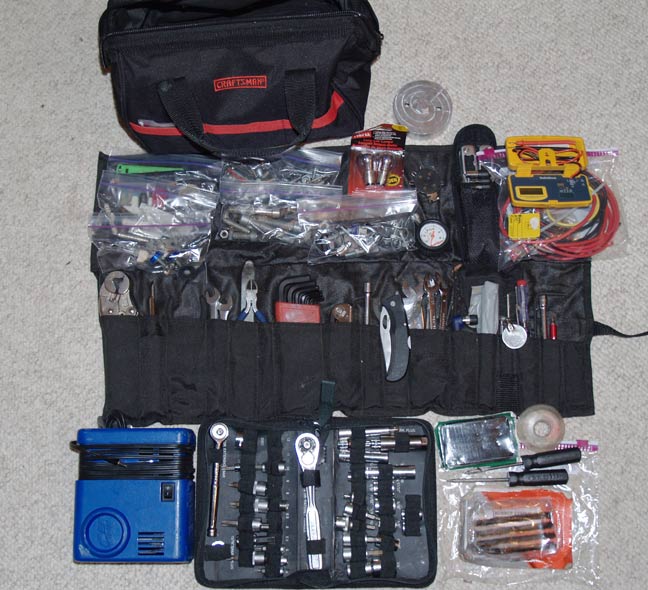
The basics you have, now here are some items that will help make it easier:
*2 14" Motion Pro tire irons, you can use other brands, but you need two
*Leather swatches 6"x6" or so. I got mine from a furnature store that throws them out. Use these instead of rim protectors. They are near free, work better, wont slip, and last a long time.
*RU Glyde from NAPA is the best lube you can get, and is cheap.
*Small brush to put the RU Gylde on.
*Valve core removal tool, cheap is fine, plus a couple extra valve stems and cores.
*Alcohol, to clean your rims for the weights.
*www.marcparnes.com wheel balancer will make it easier.
*C-clamp or better yet, a clamp to hold the bead in place.
*Small cheap compressor.
*Good clamp on tire adapter for the compressor so you don't have to hold it when the bead pops.
*Tire Guage
*Tape to hold the weights
*Torque wrench
I will list torque values where appropriate, as well as any hints that might help.
(similar on most bikes.)
Caution: This pictorial is for informational purposses only. I accept no responsibility for accuracy, or any damage caused to your motorcycle if you choose to perform these maintenance items.
Since I am often asked to help people change their tires, I thought it would be cool to make up a little tutorial about how it is done. It wont substitute for direct experience, but it should give you a start.
The basics you have, now here are some items that will help make it easier:
*2 14" Motion Pro tire irons, you can use other brands, but you need two
*Leather swatches 6"x6" or so. I got mine from a furnature store that throws them out. Use these instead of rim protectors. They are near free, work better, wont slip, and last a long time.
*RU Glyde from NAPA is the best lube you can get, and is cheap.
*Small brush to put the RU Gylde on.
*Valve core removal tool, cheap is fine, plus a couple extra valve stems and cores.
*Alcohol, to clean your rims for the weights.
*www.marcparnes.com wheel balancer will make it easier.
*C-clamp or better yet, a clamp to hold the bead in place.
*Small cheap compressor.
*Good clamp on tire adapter for the compressor so you don't have to hold it when the bead pops.
*Tire Guage
*Tape to hold the weights
*Torque wrench
I will list torque values where appropriate, as well as any hints that might help.
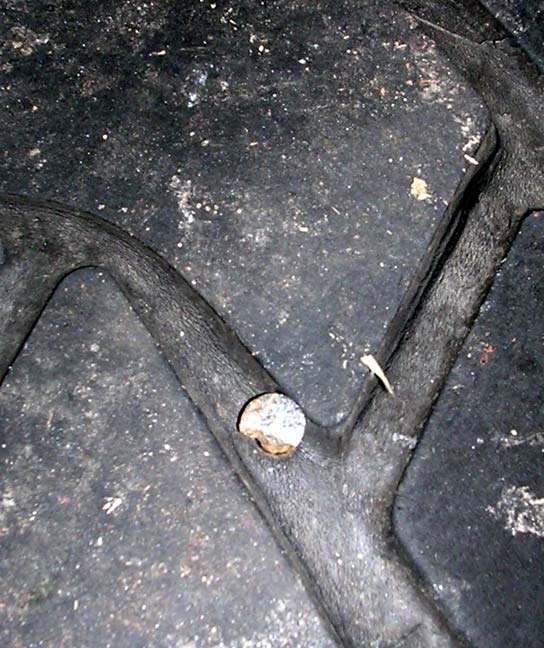
This tire was about worn out anyhow, but the nail in it made me do it sooner.
If you plan on doing it yourself, it helps to have an assistant. Mine for the evening was my EX-GF Tina. She is assisting by taking pictures! Normally your assistant will help in a more direct way!
If you plan on doing it yourself, it helps to have an assistant. Mine for the evening was my EX-GF Tina. She is assisting by taking pictures! Normally your assistant will help in a more direct way!
Bike on the centerstand, remove the lug bolts. On the 12GS/ST/RT it is a T-50 Torx socket. No need to remove the brake caliper on the 12 series, though some 1100/1150 R bikes and K bikes need the caliper removed as the rotor comes off with the wheel.
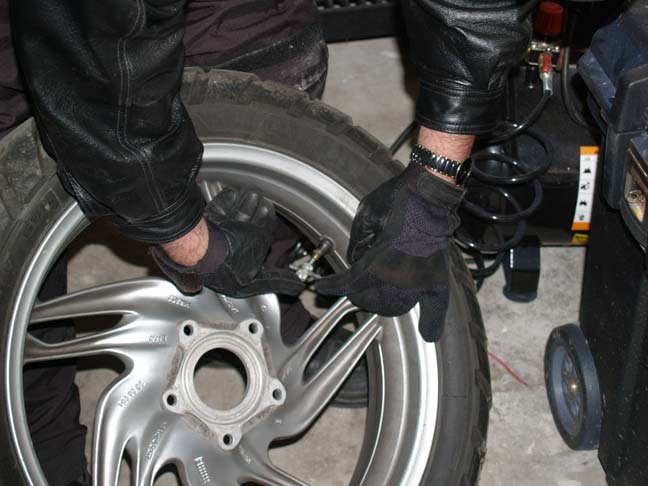
Once the wheel is off, remove the valve cap and valve core with the removal tool. I always have a couple spare valve cores in case one is bad.
Breaking the bead is made fairly easy with the HF tire changing tool with motorcycle adapter. I make sure not to let the edge of the tool touch the edge of the wheel. I am pretty good at avoiding scratches to the wheel, but it takes practice.
Once you have pushed the bead down off the wheel, you need to push it off all the way around by hand.
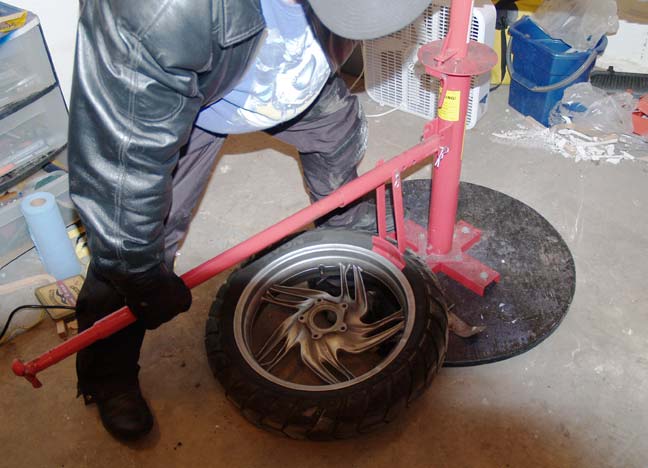
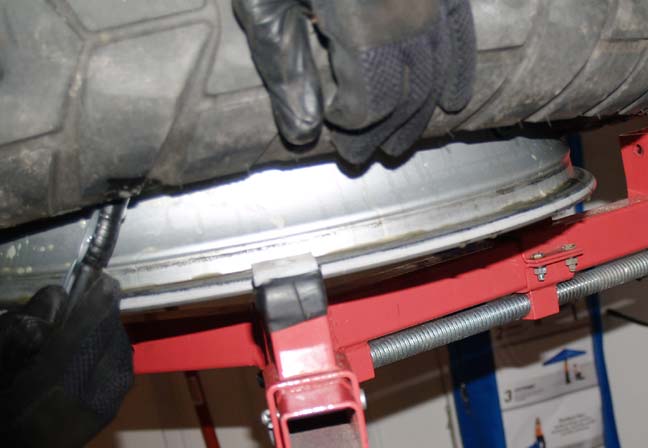
Flip the wheel over and do it again. Notice that I use a piece of thick vinyl under the wheel to protect it. I also make sure to not break the bead near the valve core with the machine. I am using the removal bar for leverage.
It probably looks harder than it is.
Once you have pushed the bead down off the wheel, you need to push it off all the way around by hand.
Flip the wheel over and do it again. Notice that I use a piece of thick vinyl under the wheel to protect it. I also make sure to not break the bead near the valve core with the machine. I am using the removal bar for leverage.
It probably looks harder than it is.
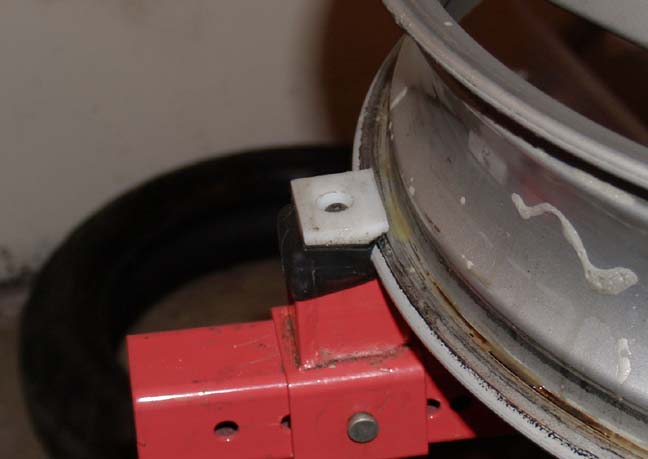
Then I mount the rim on the HF tire clamp. I make sure the clamps are in the right position to allow the center of the wheel to be centered. That way I can install the center levering bar.
Don�t be afraid to pull it down snug, your wheel can take it. I also have nylon blocks, made by my friend Kermit, that protect the wheel. The HF clamps are painted metal, and will scratch the wheels. These nylon clamps also work better with GS wheels.
Don�t be afraid to pull it down snug, your wheel can take it. I also have nylon blocks, made by my friend Kermit, that protect the wheel. The HF clamps are painted metal, and will scratch the wheels. These nylon clamps also work better with GS wheels.
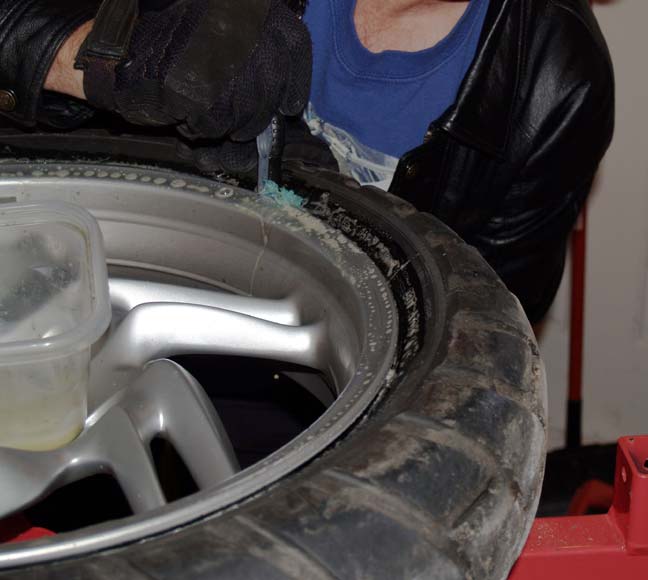
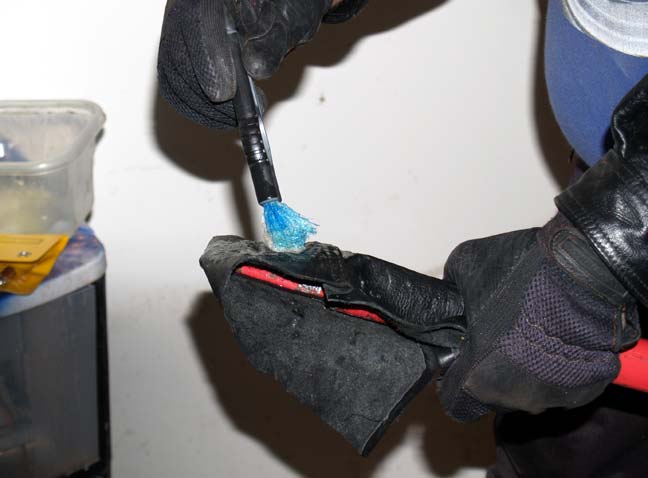
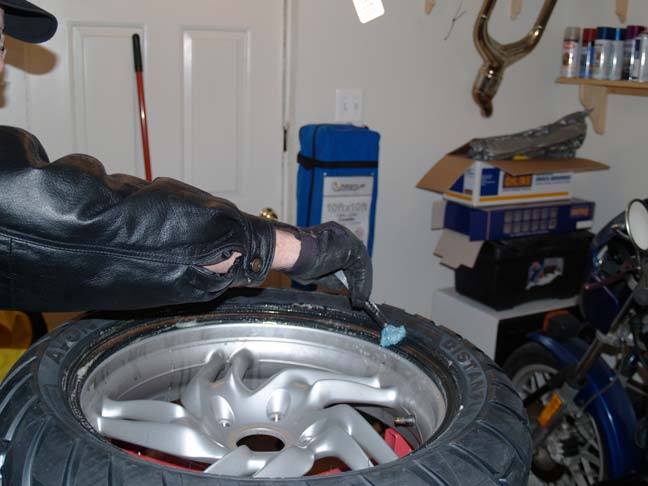
Using a lube, either special tire lube, or dishwashing liquid and soap, make sure you apply plenty to the tire bead, and rim.
I also use a piece of leather over the end of the HF tire bar to protect the rim. I lube it lightly as well.
Note: There are a few good other bars out there with nylon ends, like the Nomar, but I find the HF init works fine, and came free.
Note: I now have a NoMar bar, and it works fine, but the HF unit is OK for occasional use.
Note: There are a few good other bars out there with nylon ends, like the Nomar, but I find the HF init works fine, and came free.
Note: I now have a NoMar bar, and it works fine, but the HF unit is OK for occasional use.
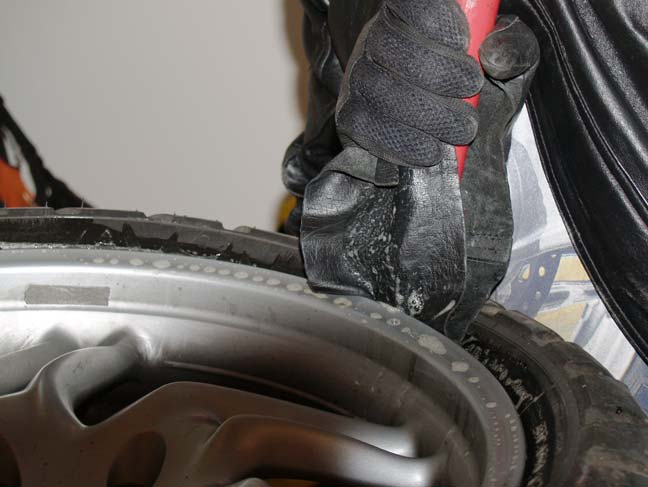
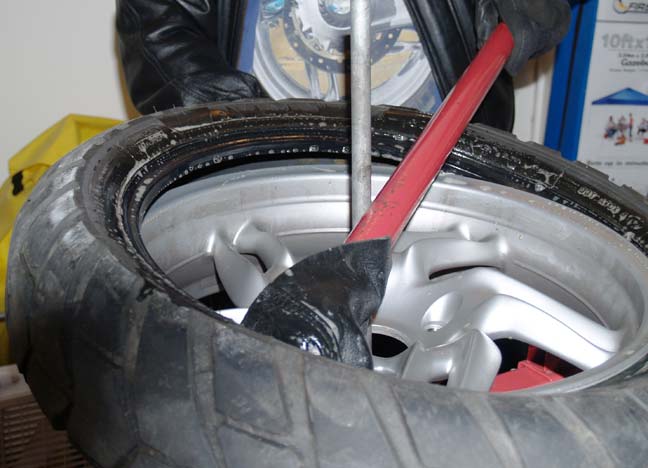
Insert the thin end of the bar in between the tire and rim.
Catch the lip of the bead on the tire and pull the bar over.
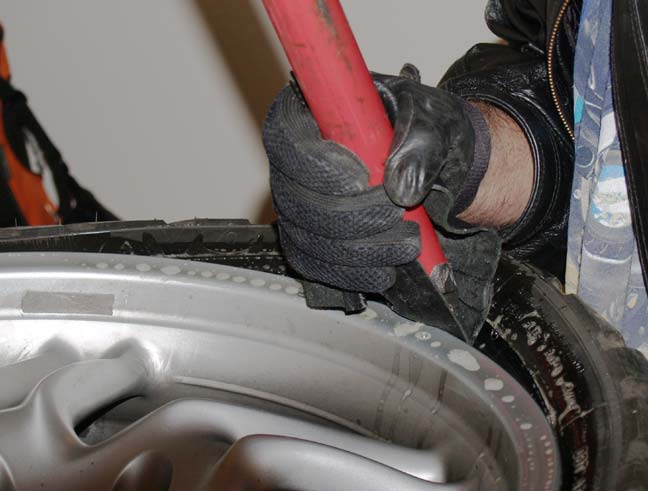
Hook the bar on the center levering bar and begin to pull. The bar will slide along removing the tire.
You may need to hold the tire to keep it from moving on the clamps, and you may need to lift up a little to make sure the tire doesn�t slip back on.
You may need to hold the tire to keep it from moving on the clamps, and you may need to lift up a little to make sure the tire doesn�t slip back on.
Pull it all the way around, or until the upper bead comes completely loose.
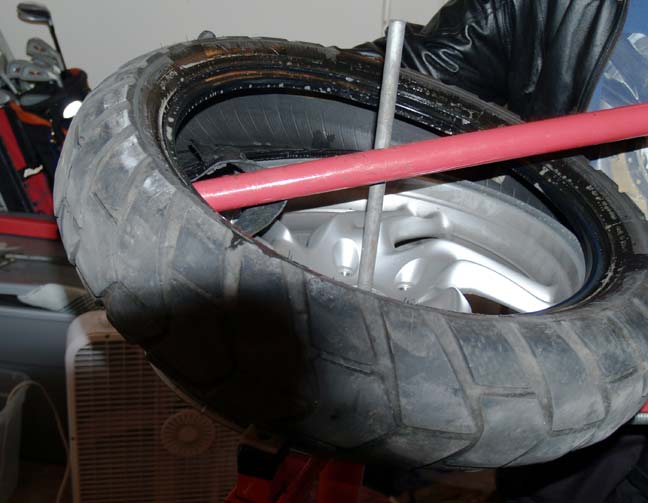
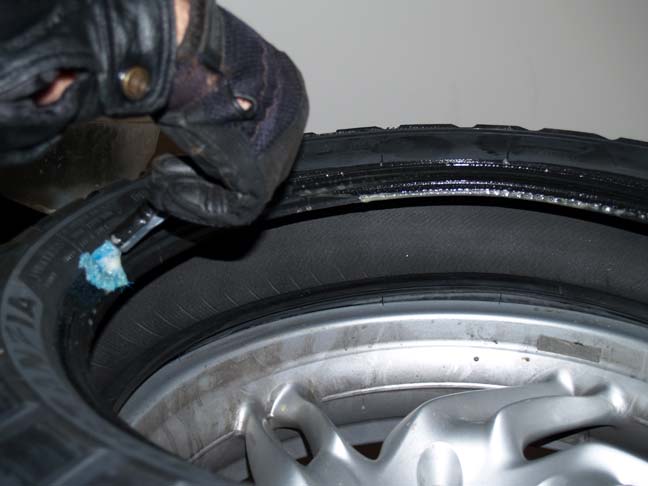
With the upper bead off, you can lift the tire and lube the lower bead.
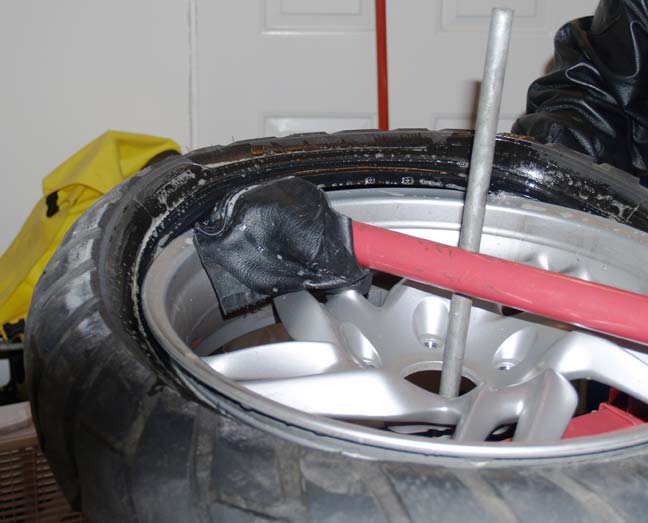
This is a little tricky, but not bad with a little practice. Next you lift the tire and insert the removal tool under the lower bead. Then twist the bar to lift the bead.
As before, you pull the lever around the bar while lifting on the tire.
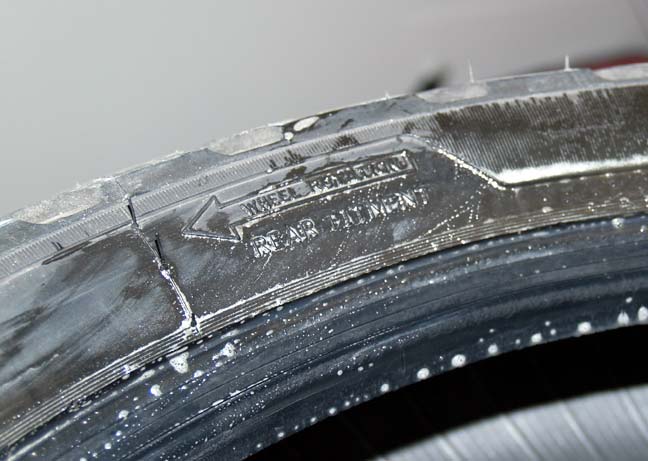
As you come around the bar, the tire will come completely free. But don�t remove the tire yet. Let it rest on the rim and check the direction of the rotation.
It is a good idea to check the rotation, see arrow, then place the tire on the ground in the same orientation as it came off, just in case you forgot the direction.
At this time it is a good idea to clean the inside of the rim, and make sure there is no damage, and no burrs on the rim.
Some people actually clean the wheel now as well!
Some people actually clean the wheel now as well!
Here is a nice look at how Kermit�s rim protectors work on the HF unit. And no, he doesn�t make them publicly. You can make your own from a 1� square block of nylon. We also add small sections of bicycle innertube to keep the rim from slipping. You can also get them at this link.
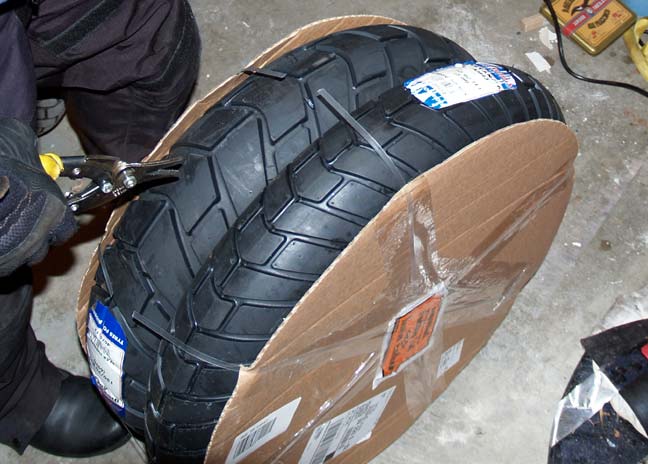
Clip the tires from the package, and ensure they are the correct size. (You should probably do this BEFORE removing your old tires and wheels. Also, leave them in the sun, or next to a heater to soften them up.
Check the rotation of the new tire. Make sure it is pointing in the same direction. Ignore the tread pattern unless you know that you want to put it on backwards (NOT recommended unless you KNOW what you are doing).
Make sure you flip the tire over and lube the bottom side thoroughly for installation.
Note: I said flip, but keep in mind some tires have a directional arrow only on one side, so the arrow may be on the bottom. Just make sure you have the orientation correct.
Note: I said flip, but keep in mind some tires have a directional arrow only on one side, so the arrow may be on the bottom. Just make sure you have the orientation correct.
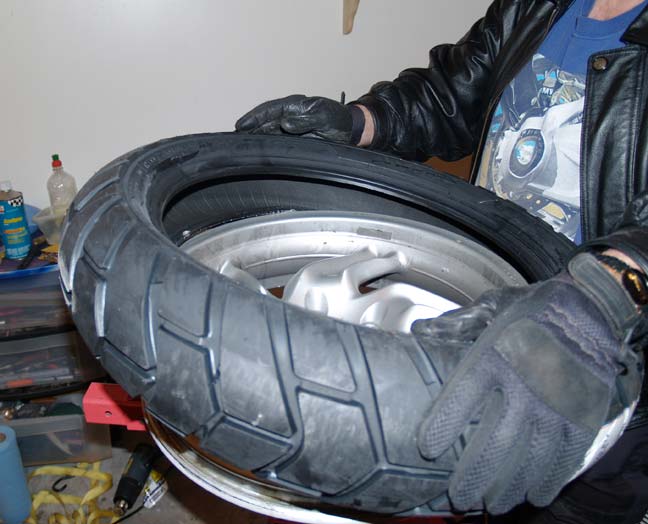
Flip the tire over and push one side on, just the lower bead. At this time you can use the heal of your hand, or a rubber mallet to force the tire over the rim.
Keep the lower bead centered on the rim, in the indented spot, and the upper bead above the rim. It takes a bit of work on some tires, but isn�t that hard.
Occasionally you may have to �spoon� the tire on the last little bit. See this technique later.
Occasionally you may have to �spoon� the tire on the last little bit. See this technique later.
Once the lower bead is all the way on, lube the upper bead thoroughly.
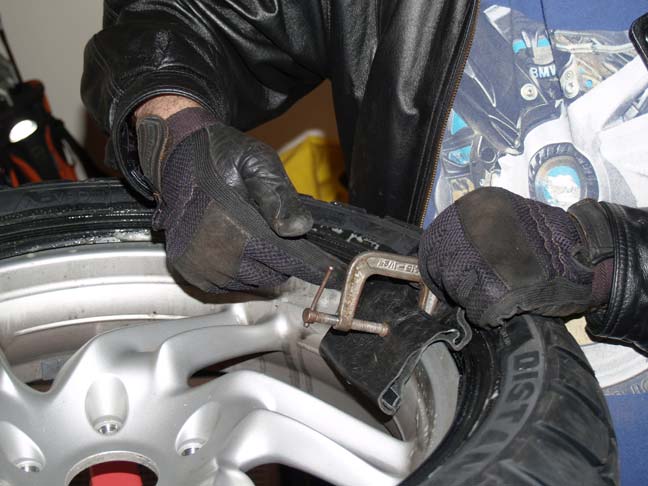
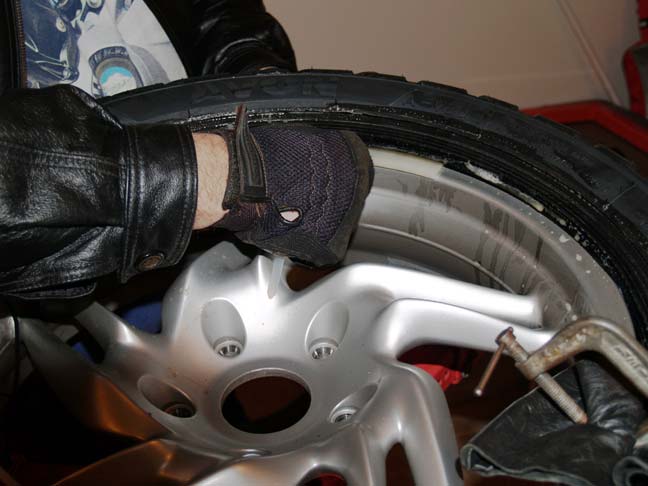
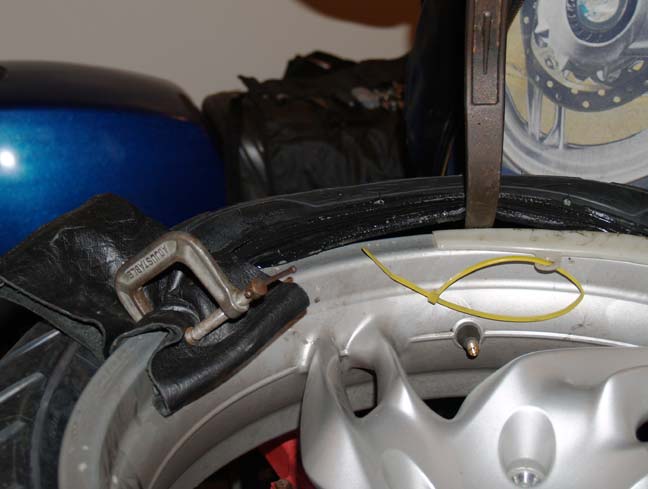
I install a C-clamp on the wheel with a piece of leather, you can use rubber or plastic, to keep the bead from �walking� around as I spoon on the tire.
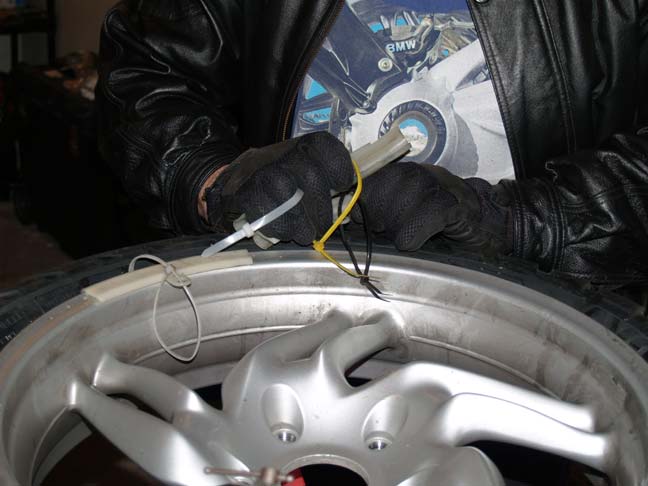
I also insert rim protectors to prevent scratches. Notice I used zip ties on them? This is to make them retrievable if they slip off into the tire as I install it. They also help in that I can hold on to them so they don�t slip.
You could use thick nylon, plastic or rubber, but these are nice in that they stay in place.
Note: I now skip the protectors and just use leather under the spoons when spooning the tire on.
You could use thick nylon, plastic or rubber, but these are nice in that they stay in place.
Note: I now skip the protectors and just use leather under the spoons when spooning the tire on.
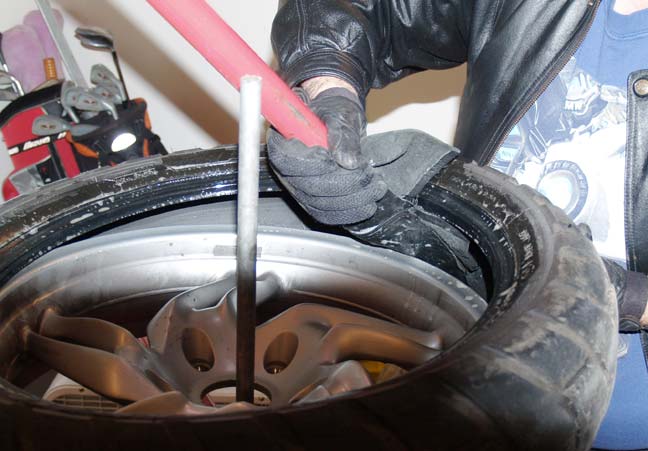
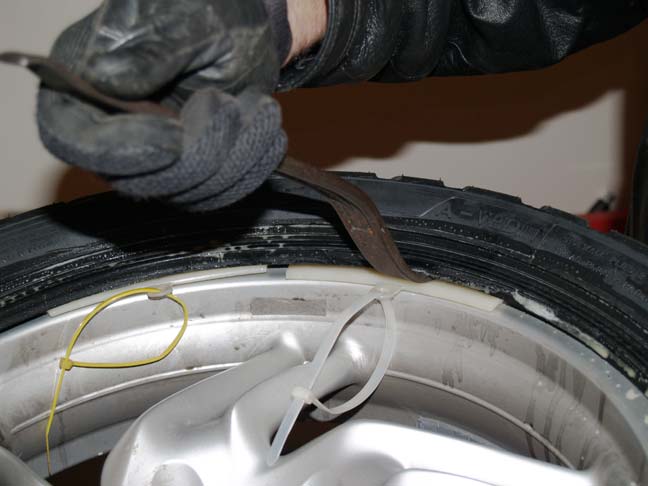
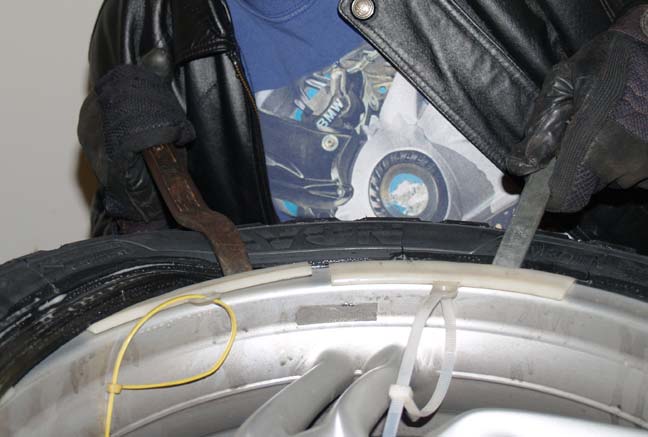
I use a 14� Motion Prow lever to �spoon� on the tires. Notice the orientation of the lever. It is precisely this shape of the lever that makes me use it. It is easy to get in, grips well, and allows a lot of leverage.
Make sure the lever is used only on the rim protectors to avoid scratching the rim, or leather.
Make sure the lever is used only on the rim protectors to avoid scratching the rim, or leather.
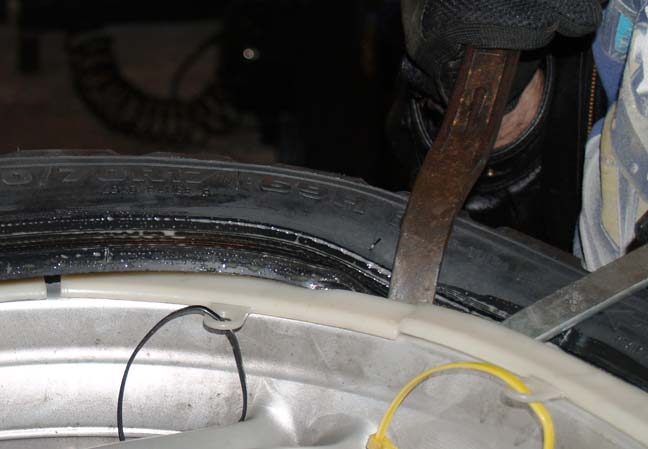
I have a couple of generic 9� levers that I use to hold the bead in place while I am moving the big one to the next spot. Make sure you place it under the rim protector as shown.
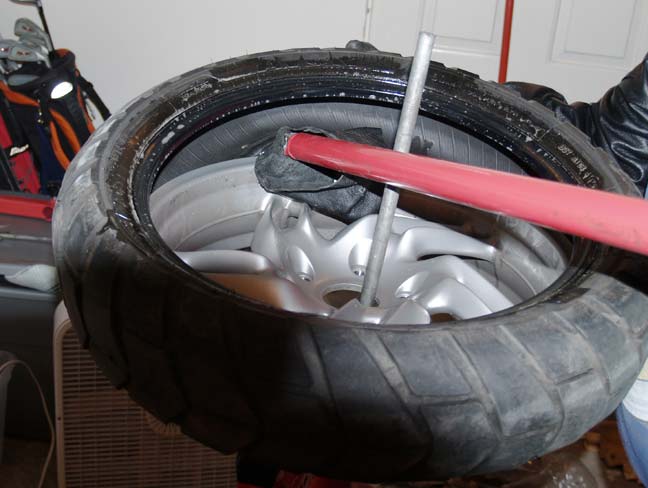
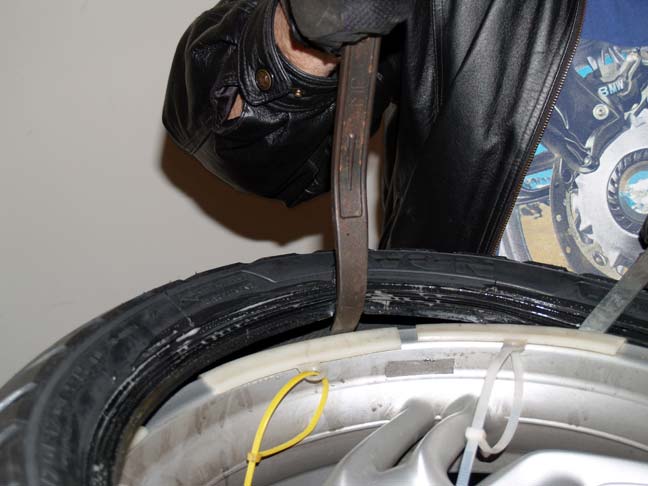
Here you can see I have moved over about 6 inches and am beginning to lever the tire on again.
I have moved again.
Note: It is very important to keep the upper bead of the tire in the deeper middle of the rim. This gives you the needed room to be able to lever the bead over the other side of the rim. If you find the tire getting very hard, or impossible to lever, you most likely need to move the bead on the opposite side into the well of the rim. It will often move out on its own.
Note: It is very important to keep the upper bead of the tire in the deeper middle of the rim. This gives you the needed room to be able to lever the bead over the other side of the rim. If you find the tire getting very hard, or impossible to lever, you most likely need to move the bead on the opposite side into the well of the rim. It will often move out on its own.
When you get near all the way around you will find that you have to lever smaller pieces of the bead.
The last little bit will be hardest, but you shouldn�t have to muscle it excessively. It should pop on fairly easily. Occasionally you may need to give it a rap with a rubber mallet.
The last little bit will be hardest, but you shouldn�t have to muscle it excessively. It should pop on fairly easily. Occasionally you may need to give it a rap with a rubber mallet.
Remove the rim protectors and the C-clamp. Make sure there is still plenty of lube on it, as it will help the bead seat when inflating the tire.
Install the valve core and cap. Then bounce the tire several times around the circumference. This helps to set the bead.
Note: Another way for stuborn tires is to ensure the tire is now even all the way around the rim.
Using a compressor with decent power, I have used the Campbell Housefeld compressor from my bike before but it doesn�t always work, to inflate the tire.
Note: Another way for stuborn tires is to ensure the tire is now even all the way around the rim.
Using a compressor with decent power, I have used the Campbell Housefeld compressor from my bike before but it doesn�t always work, to inflate the tire.
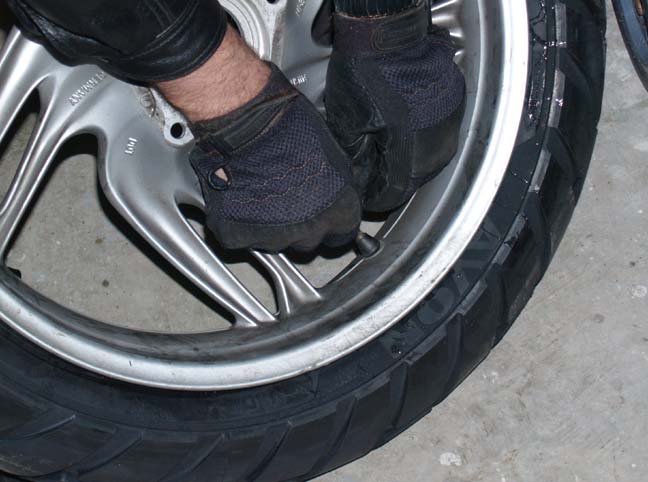
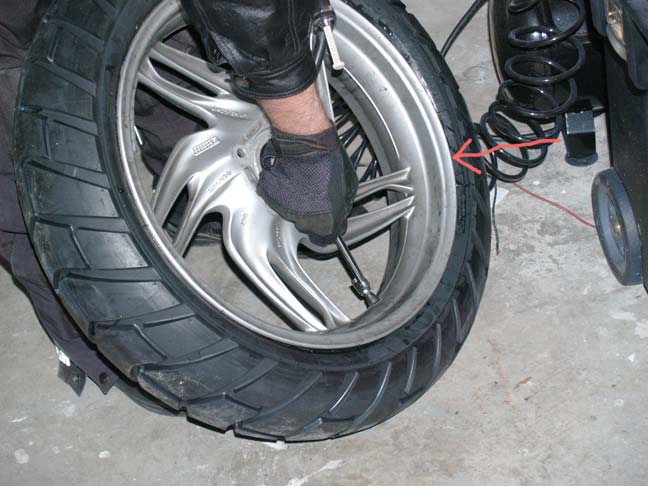
DO NOT HOLD THE TIRE NEAR THE RIM during this process. As the tire inflates it will POP onto the rim in a couple spots. If your fingers are in there you will not like the results. See the red arrow!
I have had a few instances where the tire took as much as 55 pounds of pressure to seat the bead. I wouldn�t generally go any higher than 50, though I know a few who have gone as high as 70.
If the bead wont seat, and no air is staying in, you may have to use a ratcheting strap to compress the tire to get the bead to seat with air pressure. Just make sure you remove the strap as soon as it takes air in and holds a few pounds. The pressure on the strap will not only make it hard to get off, but might cause the strap to come off explosively.
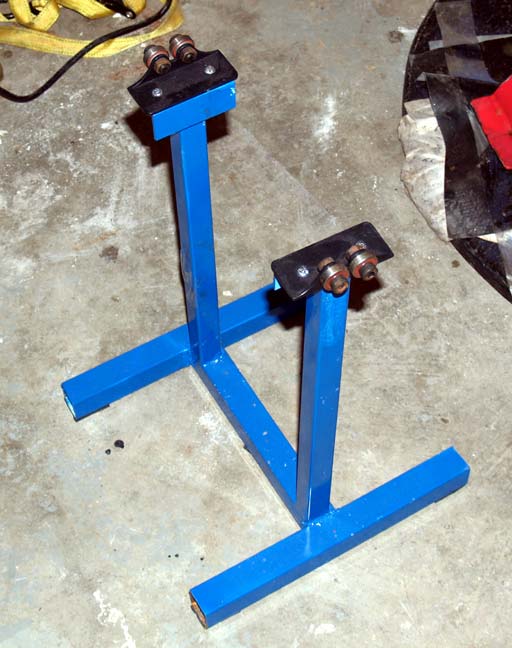
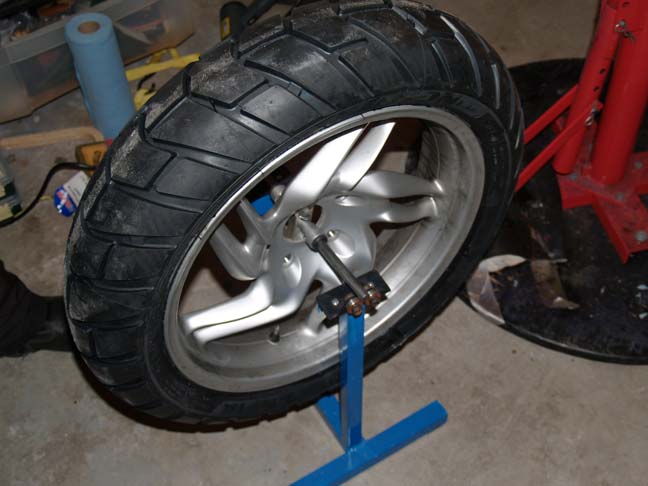
My friend Chris made this stand for me, and I attached the Beamerbalancer bearings to it.
An alternative is www.marcparnes.com for a balancer of high quality.
An alternative is www.marcparnes.com for a balancer of high quality.
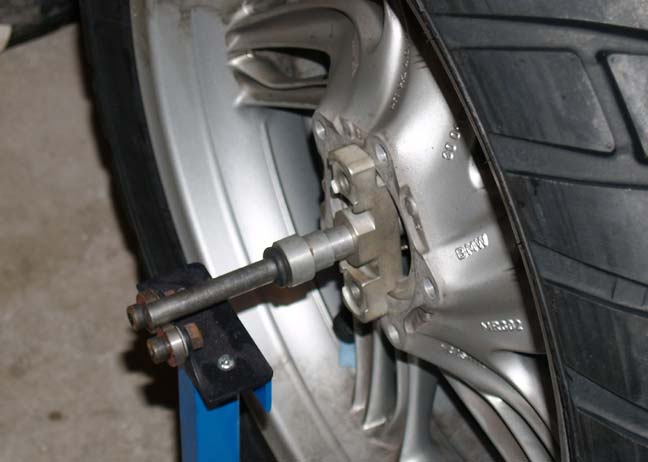
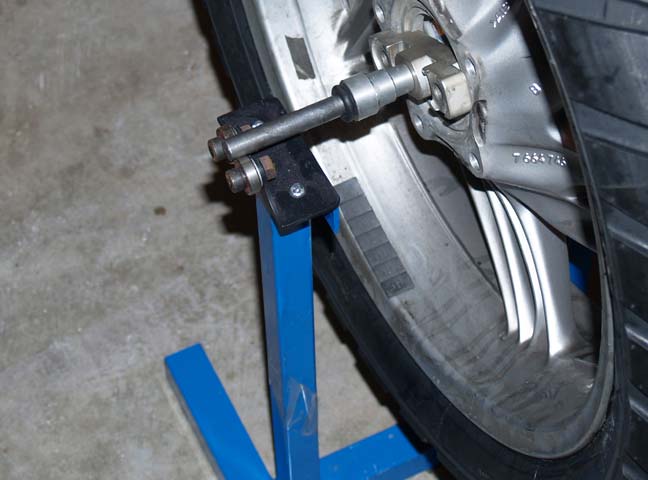
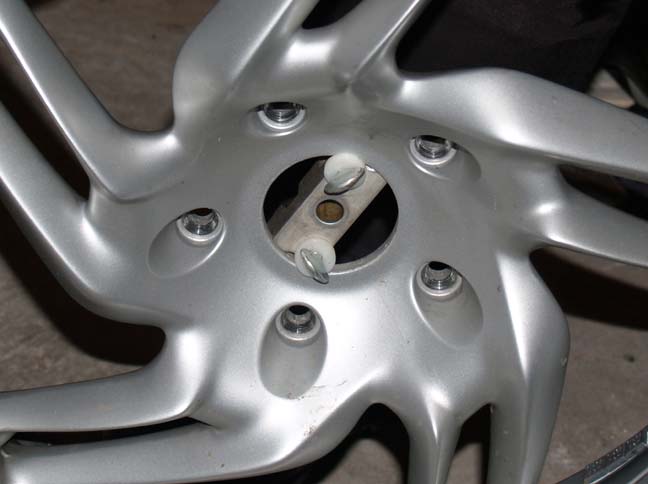
Place the beamerbalancer insert onto the wheel, ignore the rod for a moment.
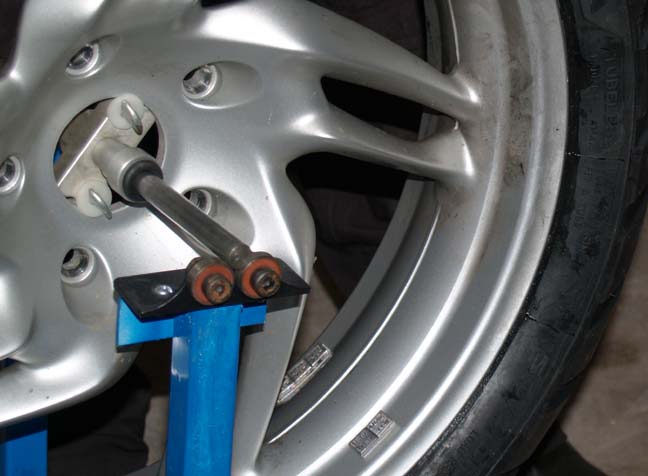
Install the adapter using wing nuts and nylon washers. Then add the rod through and put on the stepped sliders with black o-ring retainers, see above, and place it on the stand.
Note: I leave the weights on the rim. This is because sometimes it is right on with original weights, and this way I don�t have to remove them.
By the way, I did not balance this wheel. It was done for me at the MOA by the NoMar guy. I wouldn�t normally use that much weight, I would rotate the tire on the rim.
By the way, I did not balance this wheel. It was done for me at the MOA by the NoMar guy. I wouldn�t normally use that much weight, I would rotate the tire on the rim.
Rotate the tire 90 degrees from where it is and let go. The tire will, if not balanced, rotate on its own so that the heavy spot is down. If the weights are on, and the tire moves on its own. Remove them. If you release the tire and it doesn�t move, try again 180 degrees off, and if it still doesn�t move, the tire is balanced.
Try this several times until you are certain of where the heavy spot is, always down.
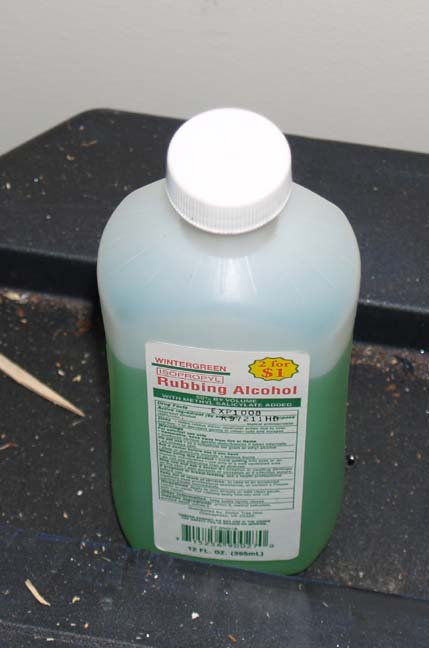
Next get some alcohol for the rim. No, not to get it drunk, but to clean it.
Clean the top of the rim; opposite the heavy spot exactly 180 degrees, with alcohol to remove grease and dirt.
Note: In this picture I spun the wheel 180� to show me cleaning the wheel. Also note that I now tape the weights on the rubber part to make it easier. I have found it makes no difference.
Note: In this picture I spun the wheel 180� to show me cleaning the wheel. Also note that I now tape the weights on the rubber part to make it easier. I have found it makes no difference.
The speed the wheel spins when released will give you some clue about the weight needed, but it takes some experience. Most wheels take less than 30 grams of weight, so you shouldn�t start with more than that.
I use tape to hold the weights on to test how much you need. Go through the process of checking at 90� intervals for balance. Once the wheel stops moving on its own when you release it, it might move a tiny bit and that is OK, you know you have the right amount of weight in the right spot.
I split the weights as evenly as possible and adhere them on both sides of the wheel. I don�t know if it helps, but it looks better, and works on car wheels.
You are now ready to remove it from the balancer, and install it back on the bike.
Place the wheel back on the bike and install all the lug nuts finger tight.
Then torque them to 60NM in a crosshatch fashion.
Now on to the front wheel.
Now on to the front wheel.
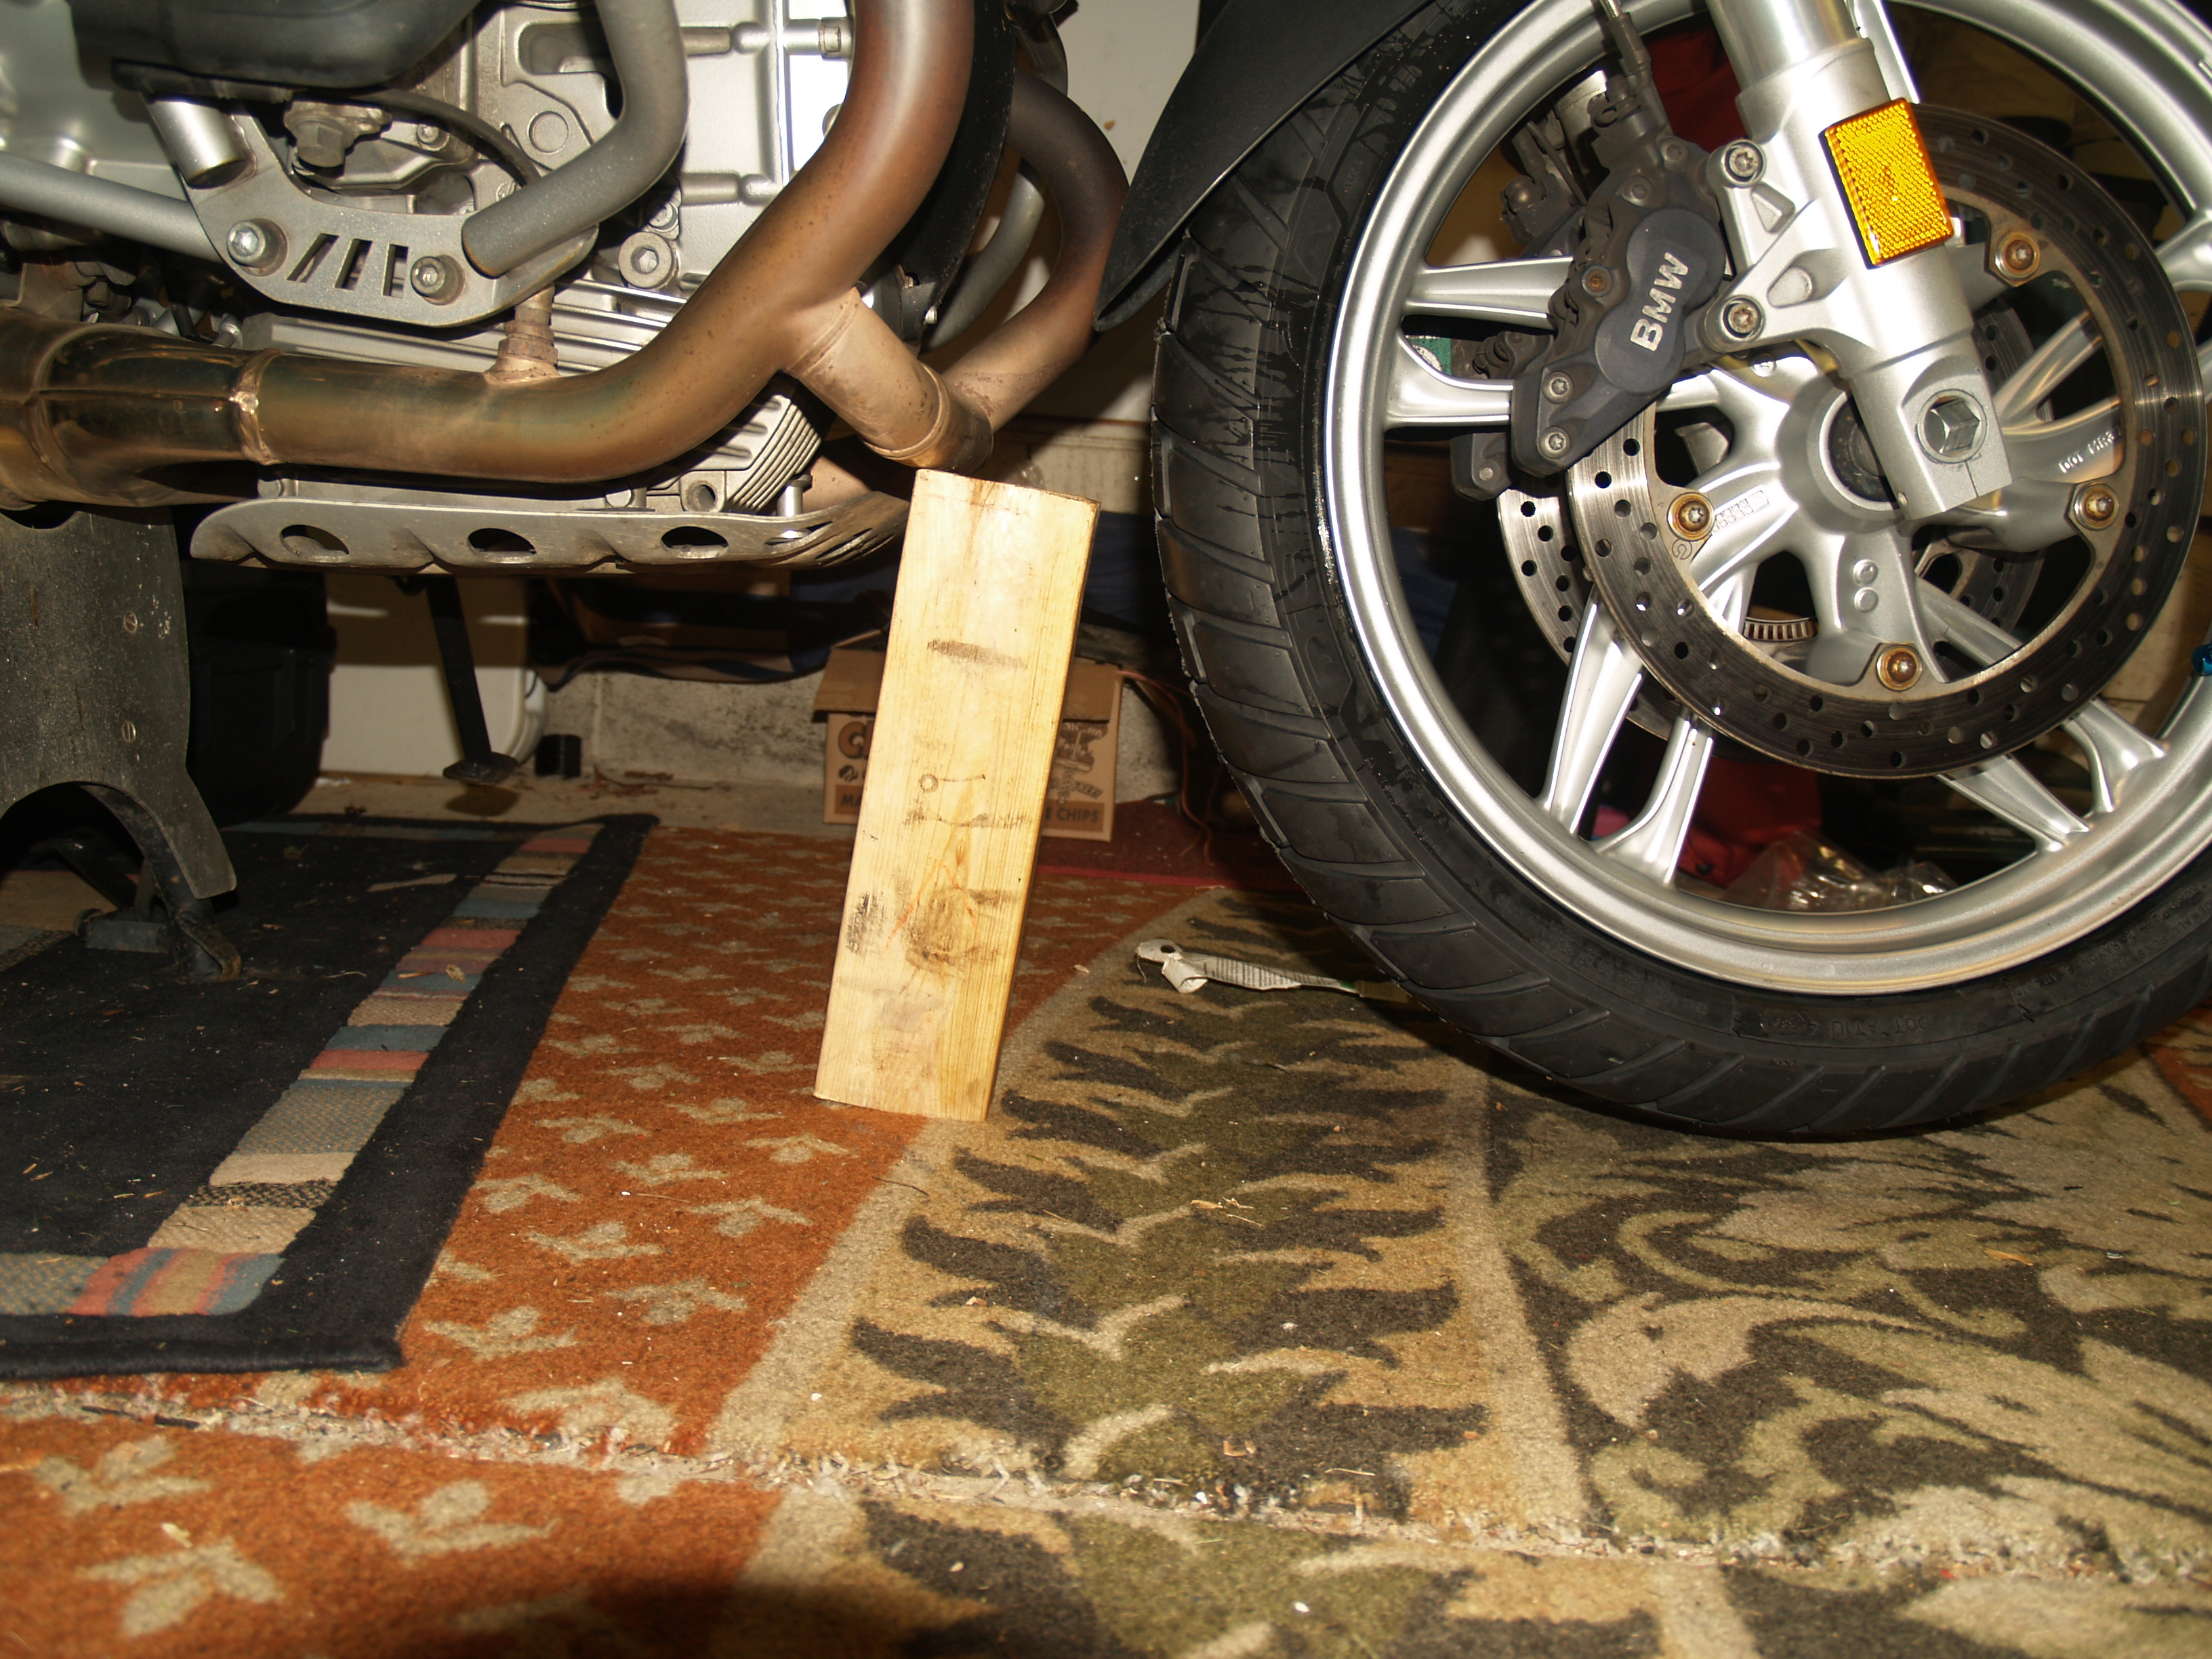
Jack. under the bash plate.
Lean a 12.5" long 2X4, your size may vary, in front of the exhaust at an angle, then push down on the back and it will pop into place on it's own, and is plenty stable for wheel removal.
Raise the front of the bike using a jack, like I did, or block it up with wood, or anything you choose. It doesn�t have much weight on it, and it will be stable on the centerstand.
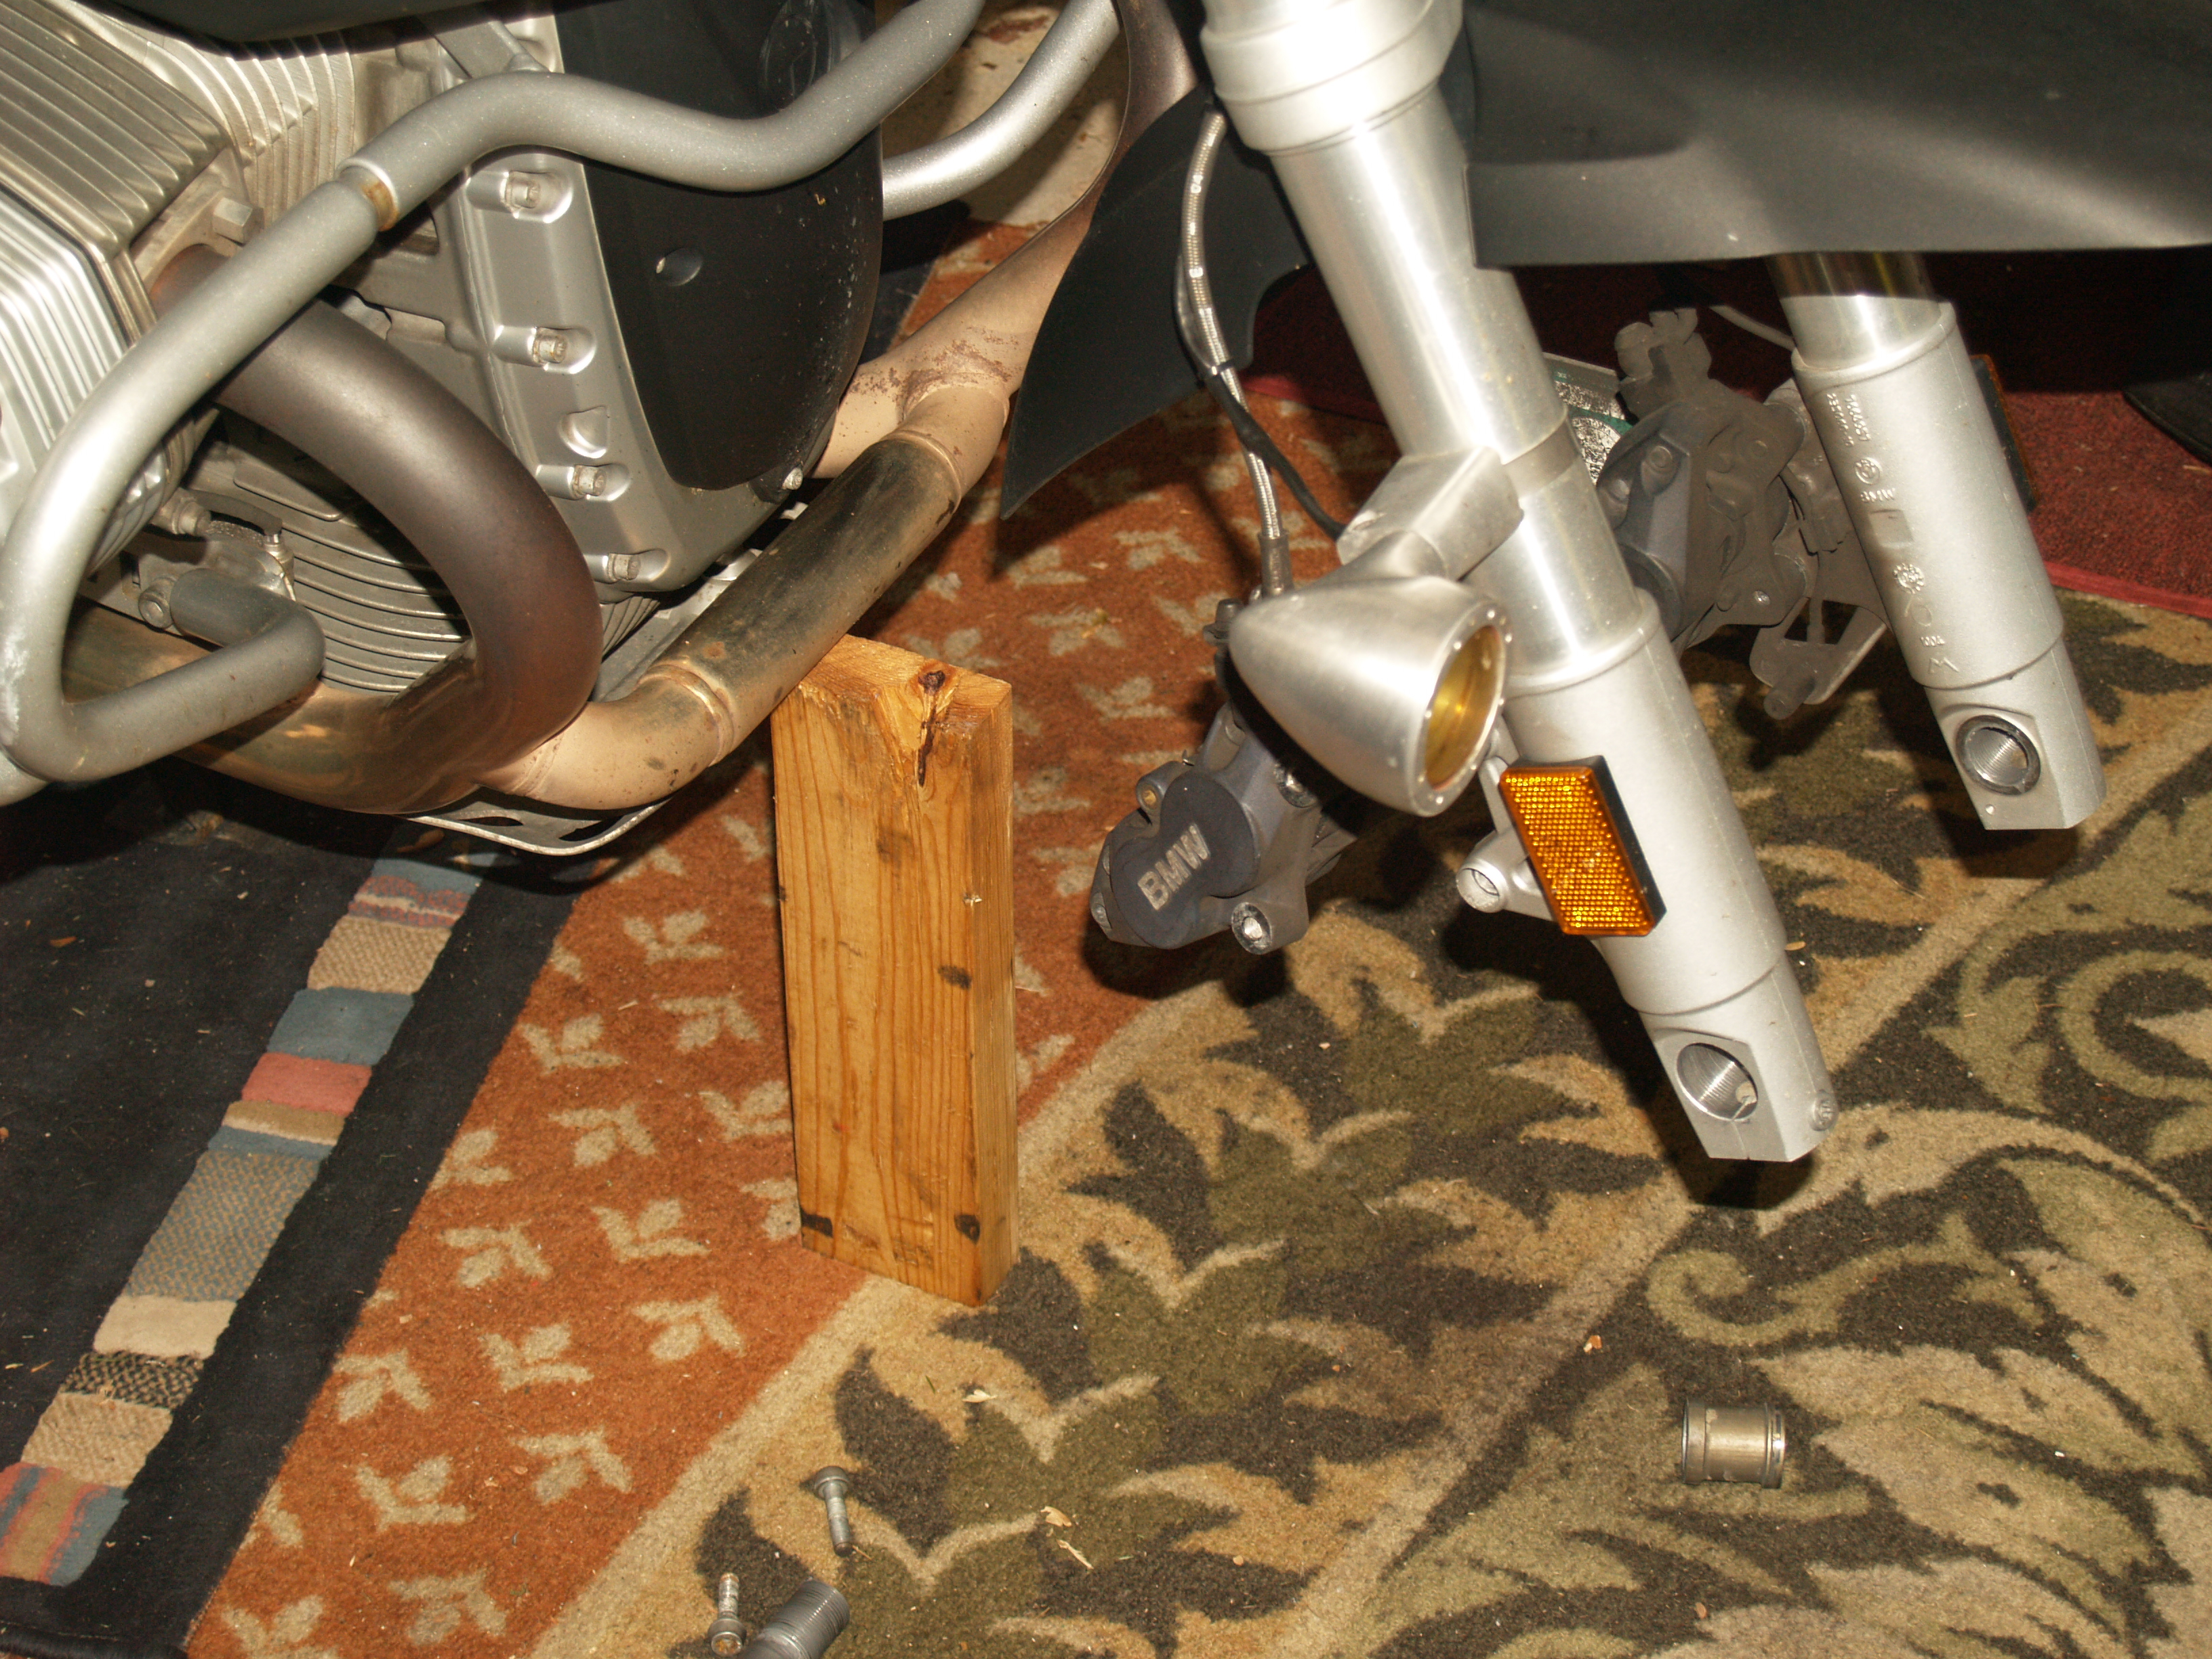
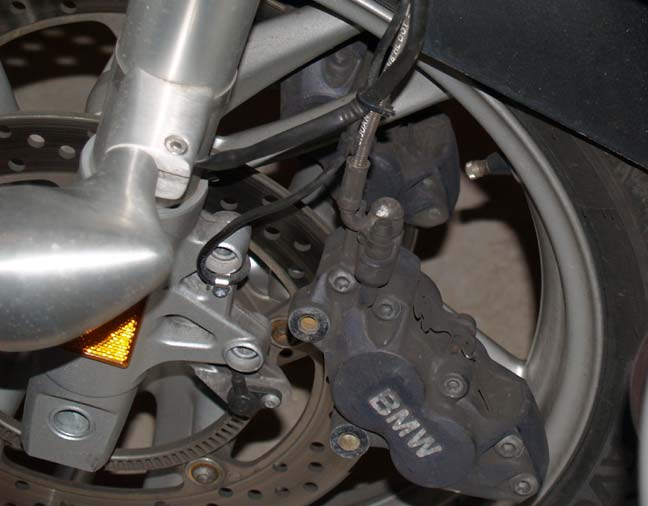
Remove the caliper bolts.
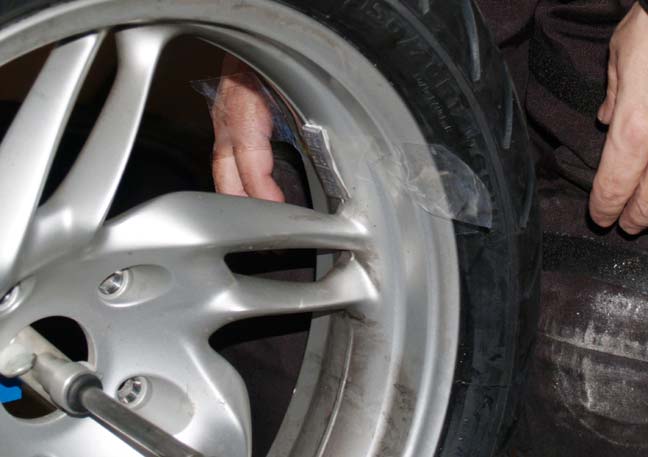
Remove the inspection sticker placard if you have one.
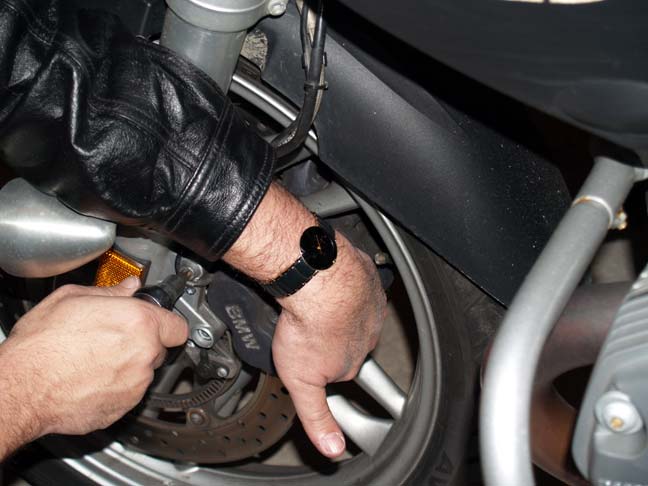
Tweak the caliper sideways on the rotor, this is especially important for bikes with 17� rims, as you would otherwise not be able to work the caliper off. It also spreads the pads making reinstallation much easier.
Remove the inspection sticker placard if you have one.
Tweak the caliper sideways on the rotor, this is especially important for bikes with 17� rims, as you would otherwise not be able to work the caliper off. It also spreads the pads making reinstallation much easier.
I just gently let the caliper hang by the brake line. The caliper doesn�t weigh much, and it doesn�t hurt it. However, if it bothers you, use a string or coat hanger to hang the caliper.
Now do the same to the other side. (Or, skip the left side and do only the right side. It usually works.)
Now do the same to the other side. (Or, skip the left side and do only the right side. It usually works.)
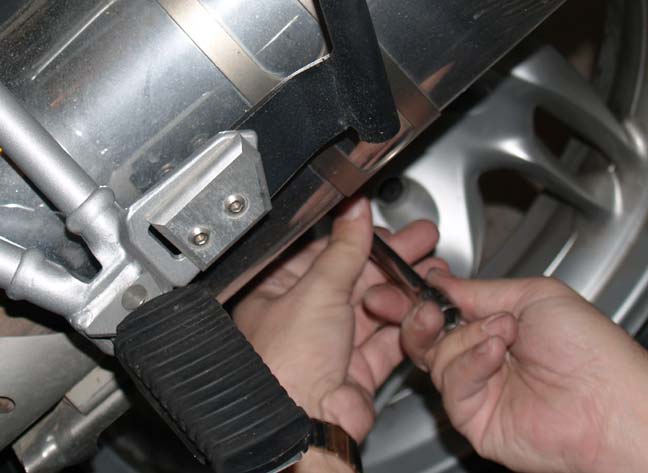
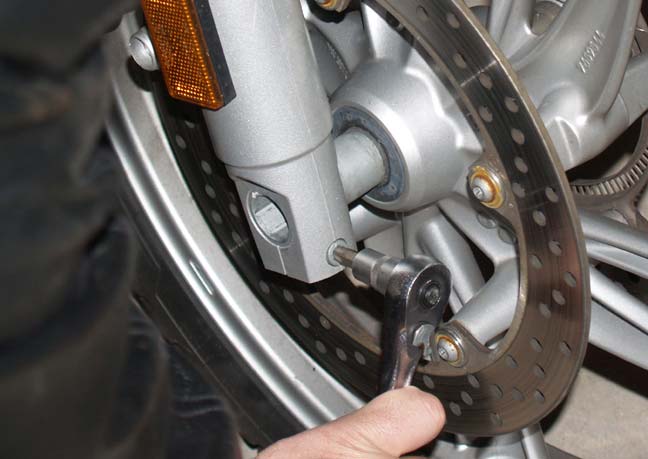
Next loosen the pinch bolt, but don�t remove it, just so it has no torque on it at all, a couple threads out from finger tight.
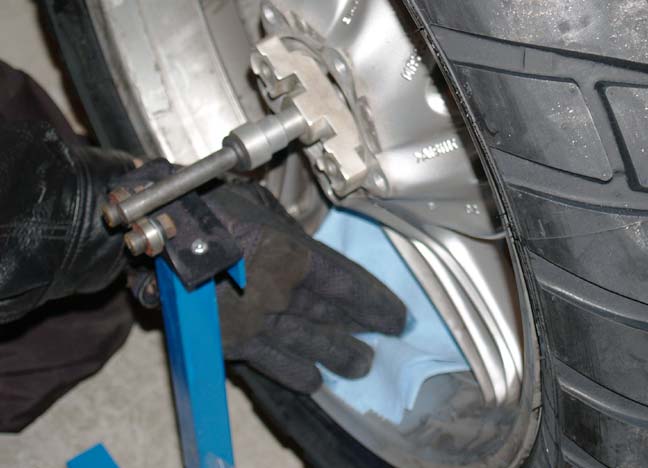
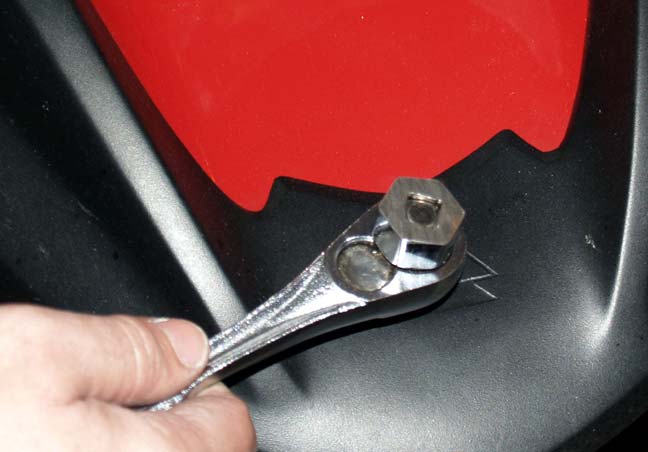
I made a tool for the 22mm axle shaft out of a 13/16� Taiwan spark plug socket. I just cut the end off. This makes it easier to carry and use, but you could use the socket on the extension backwards to do the same thing.
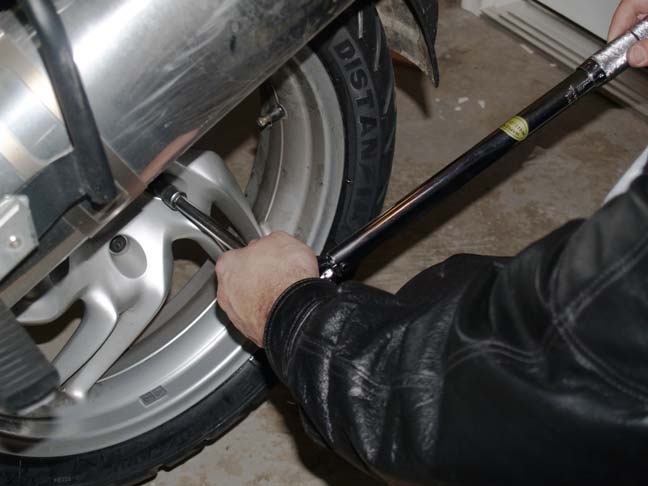
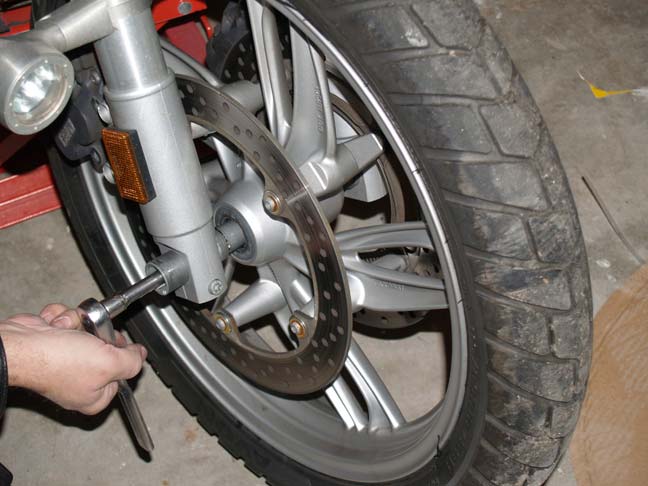
Loosen the axle shaft and remove it.
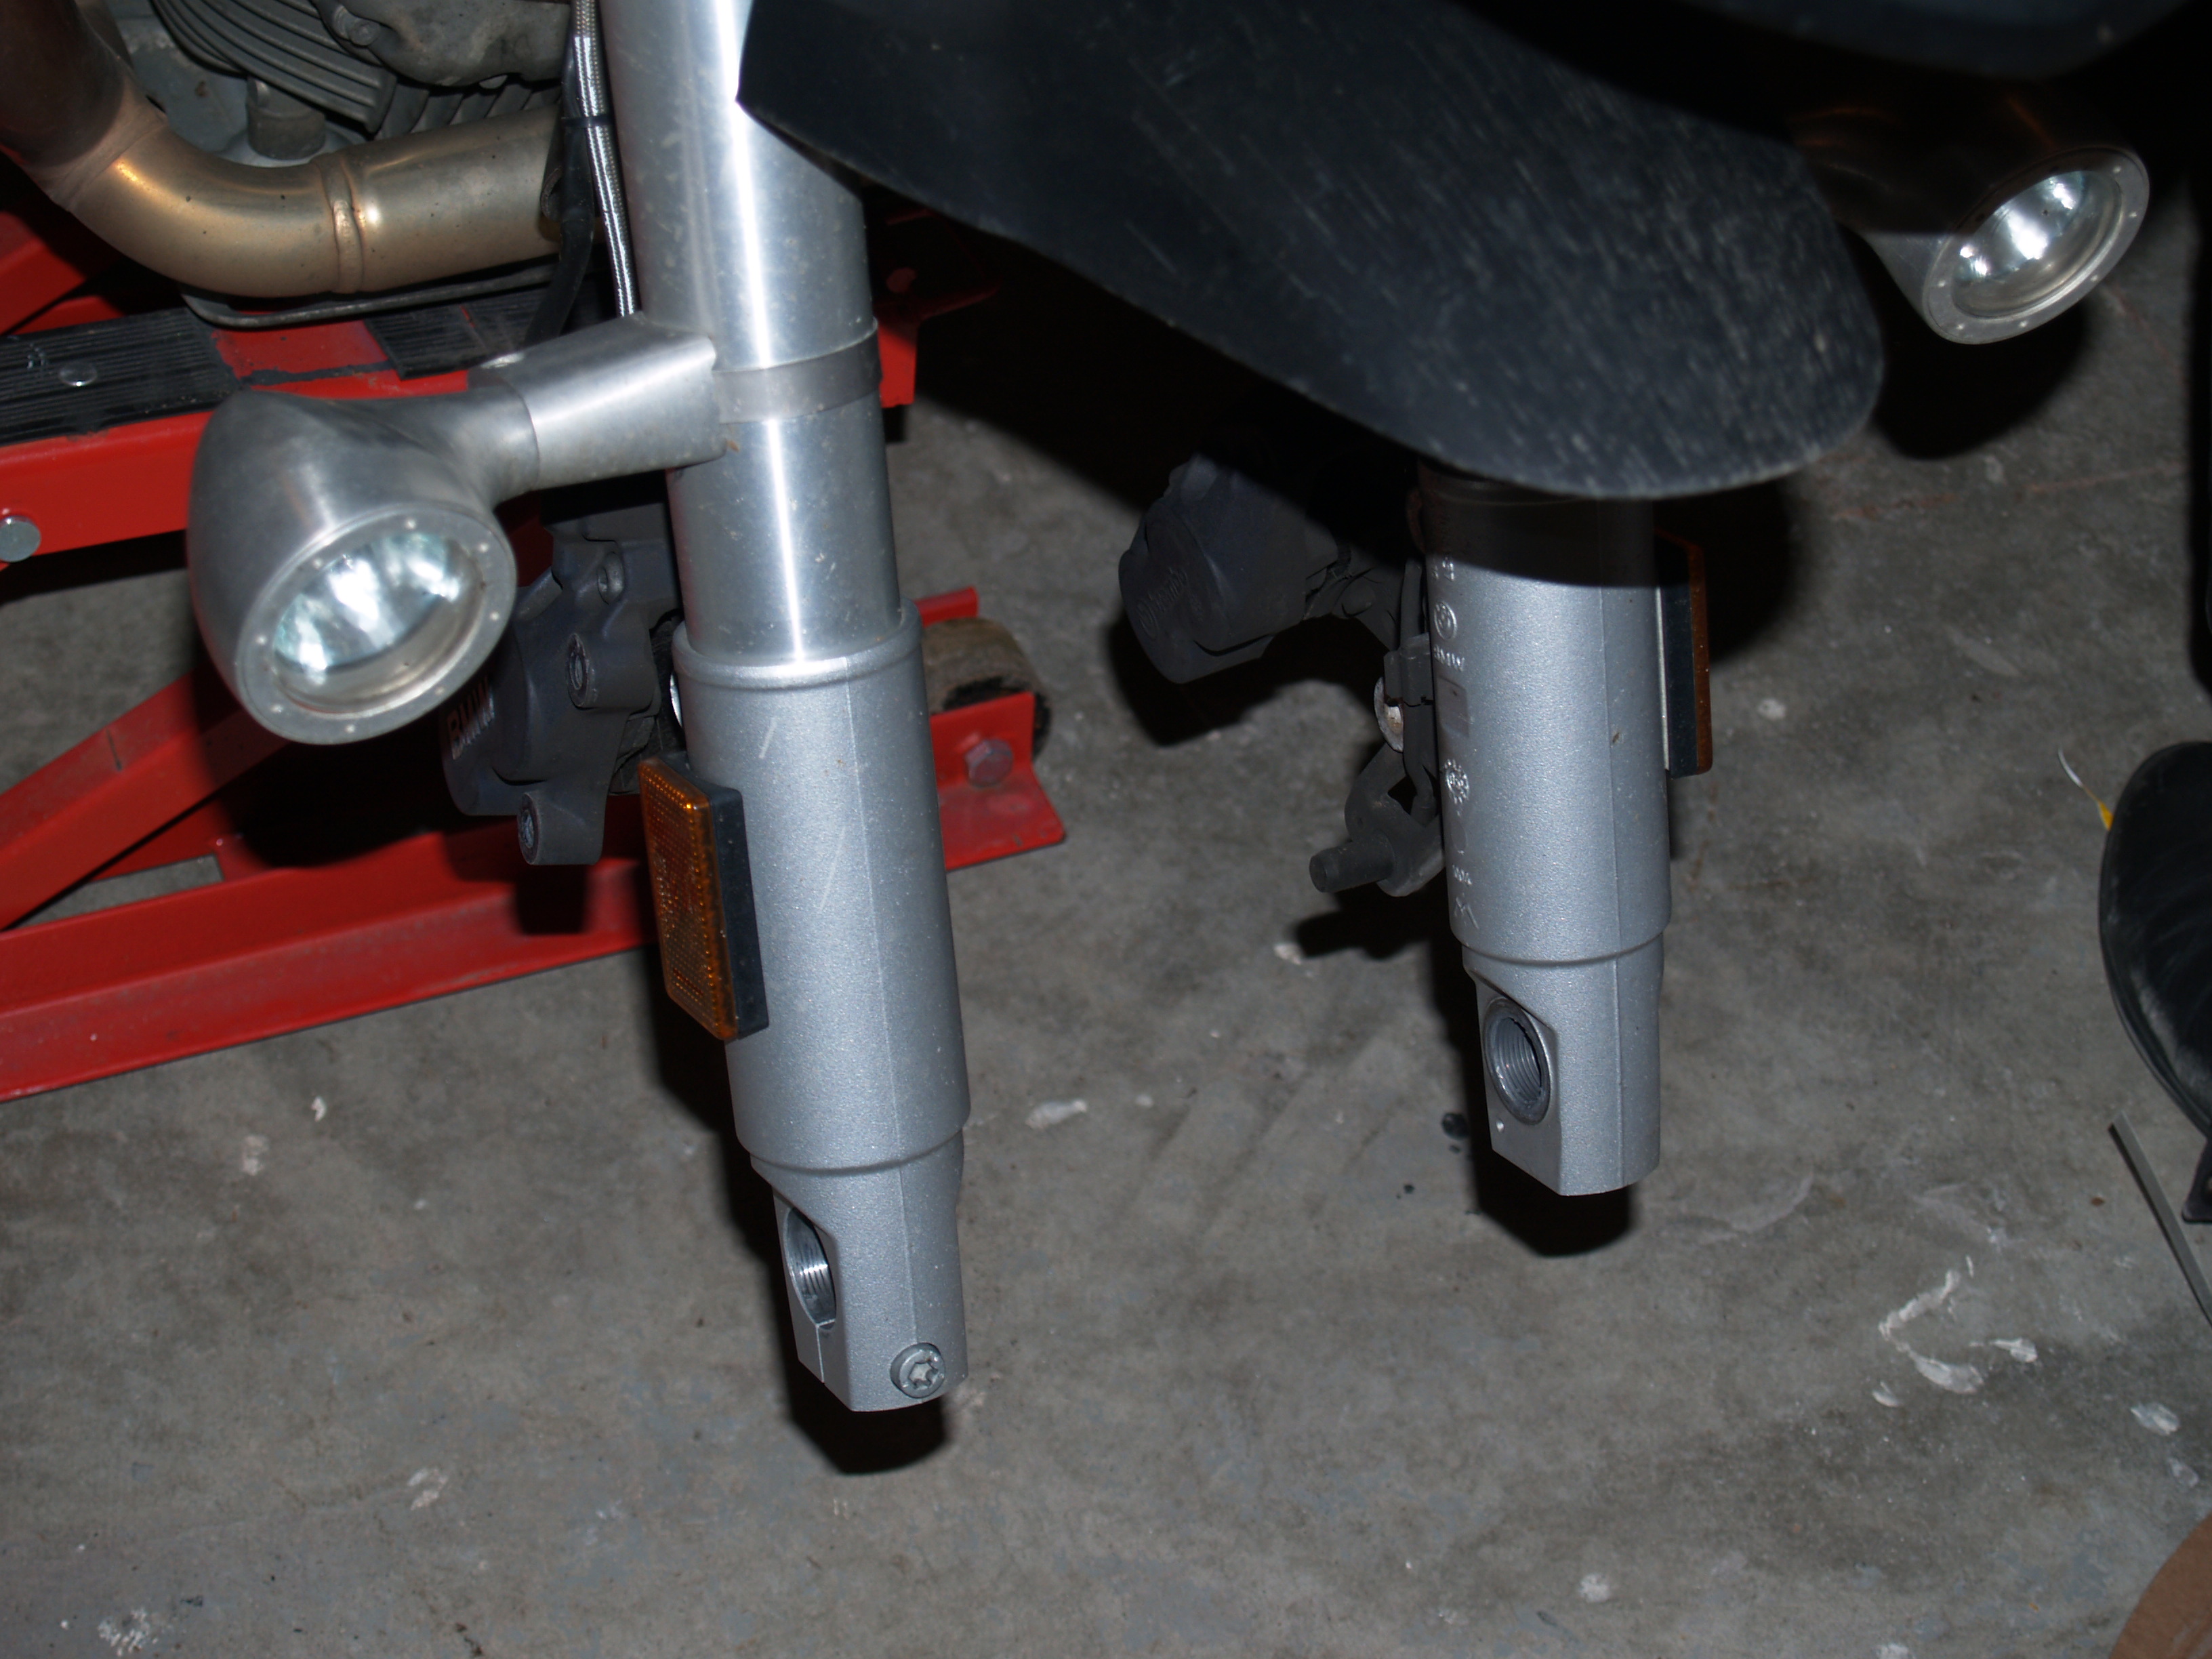
Be ready to catch the tire as it will drop partially when you pull the axle shaft out. Also catch the spacer on the left, opposite, side.
Pull the axle shaft out and remove the wheel.
See the above for dismounting and mounting the tire, as well as balancing it.
Install the front wheel in reverse order of removal, and tighten the bolts to the following torques:
Front axle 50 NM
Pinch Bolt 19 NM
Caliper Bolts 24 NM
When you are done, and the bike is ready to ride, make sure you give the brakes a couple pumps to get full power back. (Servo brakes do not need this, but you should test them before riding off.)
Other advice, make sure you take it pretty easy until the tires are scrubbed in. Depending on how you ride, this could be up to 200 miles.
I hope this helped, and I hope you will point out any errors to my tutorial.
Jim
PS I have done over 200 tires so far, and the process get's easier all the time.
Download a PDF of this process!


JVB Productions
Motorcycle Maintenance and Repair Videos